Monday, May 16, 2011

I Love My......Sally Hansen Insta-Dri top coat


 I think that Sally Hansen's 
Insta-Dri top coat is one of the best, yet one of the most over-looked top coats available on the market today.
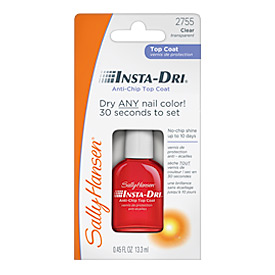

I, myself am guilty  for walking by this little gem on several occasions.

But, a few months back, fellow YouTuber Mary, aka Getting Nailed
did a test of several different top coats.
She tested the speed of dryness 
durability, and most importantly, the smudge proof test.

Don't know what I' referring to?
Let me give you an example.
Have you ever painted a nail design, 
and then wanting to seal in your hard work, you applied a top coat only to have it smear your work?

Oh yes, we've all been there.

With Mary's testing, she proved that Sally Hansen's Insta-Dri not only dried just as fast as some other main top coats such as Seche Ultra V & OPI Top Coat, but each and every application was smear-free.


And ever since then, it has become a staple in my daily nail life!
I still have a few other top coats lingering around, and if I'm applying just a single wash of color, but for all the designs I do, THIS
is the only top coat I'll ever use!

What's your favorite top coat?
Have you tried Sally Hansen's Insta-Dri top coat before?

Sunday, May 15, 2011

Weekend Mani

I've really been itching to do some 
designs playing with variations of Green,
and while playing around I did this gradient
look, which is the same as my design that I did ages ago on YouTube, 
in Orange & Yellow. 
It is also available on my shop.

I liked it so much, I decided it had to be my next weekend mani!
I'll definitely be playing around more with these colors,
I'm really loving them!

Monday, May 9, 2011

I Love My.......a new weekly series

I hope you will enjoy the new weekly series that I am starting!

It's called, 
I Love My...

Every Monday a new post will go up about a product
that I am loving for the week.
Generally, you can expect it to be beauty related,
but I will certainly not limit myself to just that,
so you can expect it can be anything!

I think this is a great way to get some really 
good products introduced to you, that you may 
not have heard of, or perhaps have, but have yet to try
while also letting me rave about the things that
are my holy grail goodies & absolutely love!!


So today, for the 1st edition of 
I Love My......


This palette was created by a 
makeup artist and has been on the market for a couple of years.
If you are a makeup junky like myself, 
then I am sure you have heard of this palette, 
either through countless YouTube reviews 
or from many beauty bloggers.

I personally have a very eclectic array of makeup,
which I think is a pretty common thing.
I don't like to have individual shadows, 
blushes, just floating around.
I like to keep everything in palettes, and I've got several.
What makes this particular palette unique is two things

#1 - It has a magnetic base with no fillers.
What do I mean when I say no fillers? 
Let me give you an example...


On the upper left is a standard MAC palette, 
notice that it has the empty slots for the shadows to go? 
The Z-Palette does not (bottom right) 
It has an empty space allowing you to put small round shadows,
large, square, you name it. 
Can you remove the filler out of the MAC palette 
to give you more room? Absolutely!
But let me tell you the 2nd unique feature to this palette.


#2 - It has a clear plastic top.
For me, this is what sold me on the palette.
No more guessing what colors are in each palette, 
you can simply see for yourself.


Z-Palettes come in 2 sizes, large and small.
This is the large palette which retails for $20.oo
the small $14.00.
They also come in a couple of different colors and patterns.

It can hold 28 standard MAC shadows, 
or 14 larger shadows, such as Makeup For Ever

Of course, you can place a wide assortment of shadows, 
large and small, like my palette here.
The palette is made of a very strong and sturdy 
cardboard with a magnet base for all your 
shadows to adhere to as well as a magnetic 
cover to securely close the palette.

Labeling is pretty simple as well.
Normally I'd just mark the bottom of the shadows themselves,
but since the magnet is so strong in the palette,
rather then trying to pull the color out, I've 
simply made a print out of the shades & brands
for any future reference.


This is currently the only palette I have, 
but I plan to buy more and convert 
most of my collection into Z-Palettes!

Have you heard of the Z-Palette before?
Do you own any?
Do you love them as much as I do?


Friday, May 6, 2011

Weekend mani

OPI's Blue Moon Lagoon layered over a single coat of
Essie's Turquoise & Caicos

Pure seafoamy holo goodness!


Wednesday, May 4, 2011

Wisteria

Friend and fellow YouTuber,
Andreea aka Pinkangell3
had asked me to do a design especially for long nails,
so this is what I came up with,
perfect for Spring!


PRODUCTS USED:
PRO Nail Systems Base Coat
Essie in - St. Lucia Lilac
LA Colors Art Deco in White
KISS Nail Art in - Soft Purple
LA Colors Art Deco in - Vibrant Purple
Art Club in - Marine Dream
Dotting Tool
Sally Hansen Insta-Dri Top Coat
For the full tutorial on this look, 
please visit my YouTube channel


Monday, May 2, 2011

Hedy's Body Shop - Gel Nail Art

While browsing in Rite-Aid the other day,
I came across these
Bejeweled gel nail art stickers, by Hedy's Body Shop.


Never seeing anything quite like it before, I decided to pick 
a package up and give them a go.


The aren't decals, or stickers in the basic sense, 
but rather a thick gel with the image embedded in it. 


Each one is has a basic oval shade, with sizes ranging
from small to large to fit every nail.

I really thought they might be too thick, but once apply to the nails,
they lay down nice and smooth. 

I did cut a few of them down since I decided to 
caddy-corner them on my existing mani.
The adhesive is very strong and no top coat is needed.


My only gripe, 
though I know the camera isn't picking it up, 
is the have a slight beige tint to them, 
so if you are applying them on certain colors, 
you may be able to see the subtle difference in color.
I've had them on for a couple of days now and they haven't
shifted or lifted in any way.
I'd say these are pretty cute when you are wanting a
quick little perk to your mani.
They had a total of 4 designs available
and retail for $ 2.99 per pack.

Wednesday, April 27, 2011

Festive Flora

Hi everyone, hope you are having a great week so far!!

I've got a new design today, this one was a request
from a fellow YouTube subbie.

She wanted a Purple & Red flower design for her
mom's upcoming wedding.
 Here's the look.

PRODUCTS USED:

PRO Nail Systems Base Coat
Orly in - Honeymoon In Style
Sinful Colors in - Snow Me White
Wet n Wild Fast Dry in - Buffy The Violet Slayer
Sally Hansen Complete Salon in - All Fired Up
Ornaments 2-way nail art & brush in - Black
Sally Hansen's Insta-dri top coat


To see the full tutorial on this look,
please visit my YouTube channel,


Sunday, April 24, 2011


Wishing everyone a very 
Happy & Healthy
Easter!!

Thursday, April 21, 2011

Scavenger Hunt

Here is a simple and cute look,
just in time for Easter.
Looks like these colored eggs are the only things hiding in the grass!


PRODUCTS USED:

PRO Nail Systems Base Coat
Orly in - Honeymoon In Style
Sinful Colors in - Snow Me White
Nail Touch nail paint in - Hunter Green
Nail Star Nail & Brush Pen in - Lime
Nail Star Nail & Brush Pen in - Baby Pink
Milani Nail Art in - Green Scetch
Kiss Nail Art in - Soft Green 
Ornaments 2-Way Brush & Pen in - Black
Happy Easter Fimo mix from - Dollish Polish 
Sally Hansen's Insta-Dri Top Coat


To see the full tutorial on this look,
please visit my YouTube channel at


Tuesday, April 19, 2011

Circus Glitters - A Comparison


Ever since
Happy Birthday polish hit the scene, 
we've seen a multitude of companies come out with
their own variations of this polish.

So, I decided to do a small comparison 
with the ones that I currently have.
I commonly refer to these glitter polishes as
Circus or Carnival Glitters, 
because that is exactly what they remind me of.

These little parties in a bottle can be worn alone, 
or layered with many other polishes to give
you tons of unique looks.


Party Of Five Glitters

This Wet n Wild polish came out with their newly
released Fast Dry collection.
Small & medium sized hexagons in shades of 
Silver, Light Blue, Green, Magenta & Red 
all in a clear jelly base.
Retails for $1.99 in most drug stores


Gems

This circus glitter came out with 
Milani's Jewel FX collection, which consists of
3 highly dense glitter polishes in Silver,Gold and Gems,
all in a clear jelly base.
Again, this has small & medium hexagons in shades of
 Silver, Light Blue, Green, Magenta, Red, & Gold. 
This polish, unlike the Wet n Wild one is very densely packed,
and you can achieve opaqueness with just 2 coats.
Retails on average of $4.99 in most drug stores.


Afternoon Picnic

Klean Color's Afternoon Picnic is the most unique of 
all the polishes in that it have a very wide range of hexagons,
ranging from small to quite large hexagons.
All in a clear jelly base, the hexagon colors are, 
Silver, Yellow, Blue, Orange, Green, & Magenta.
Retails on average $1.00 - $4.00 and can be found at
some specialty beauty shops and also at kleancolor.com


While I do not own Happy Birthday myself,
from what I can tell of the countless swatches I've seen,
is that Afteroon Picnic comes closest in the color range,
while Milani's Gems comes closest in density and sizing of glitter.

Either way, this gives you a small insight 
to some of the Circus glitters that are currently available to you, 
and they all offer something special!


Friday, April 15, 2011

Weekend Mani


I've really been on a Betsey Johnson kick as of late.
Her sense of style, her designs are so bright and quirky, 
they are just so much fun, there really isn't much NOT to love!


If you don't already know, I've got an obsession with skulls, 
so when I saw these adorable earrings from her, 
I just had to have them!
I've been wearing them non-stop!


So here is my simple mani, 
my little homage to Betsey Johnson


Essie's Knockout Pout (base)
H & M's Bella's Choice (leopard spots)

Wednesday, April 13, 2011

Steampunk

Here's a funky design for all you 
Steampunk lovers!

PRODUCTS USED:

PRO Nail Systems Base Coat
Icing polish in - Golden Touch
Hurricane Nail Art Striper in - Metallic Gold
L.A.Colors Art Deco in - Silver
Martha Stewart Bullion Beads in - White Gold
Disk Sequins (doughnut sequins) in Silver & Gold
Hexagon Sequins in Pewter & Gold
Sally's Beauty Secrets Top Coat


for the full tutorial on this look,
please visit my YouTube channel